
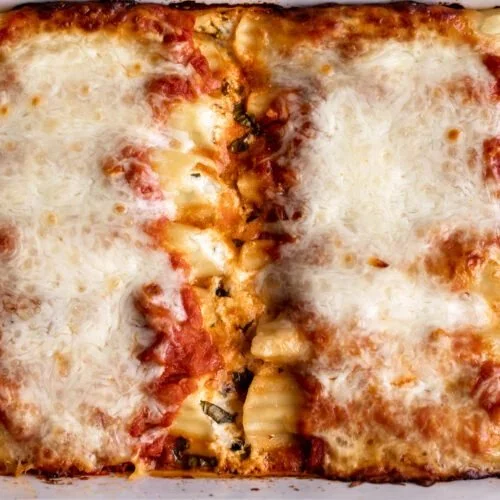
Manicotti is a delightful Italian dish that brings warmth and comfort to any dining table. This classic stuffed pasta, laden with creamy ricotta and mozzarella, is not only a feast for the eyes but also a mouthwatering treat that evokes fond memories of family gatherings and shared meals. Making manicotti from scratch might sound daunting, but with this easy Recipe and Step-by-Step guide, you’ll find it surprisingly simple. Perfect for impressing guests or enjoying a cozy night in, manicotti is sure to become a staple in your household.
Ingredients
- 12 manicotti tubes (8-ounce box)
- 1 tablespoon olive oil
- 2½ cups whole milk ricotta, drained
- 2½ cups part-skim mozzarella, divided
- ½ cup freshly grated Parmesan cheese
- ½ cup chopped flat-leaf parsley
- ¼ cup chopped basil leaves
- Kosher salt, as needed
- Freshly ground black pepper, as needed
- 2½ cups marinara sauce
These ingredients come together to create a dish that’s both flavorful and satisfying. The manicotti tubes are like little pillows that cradle the creamy filling, while the aromatic herbs add a refreshing touch. The gooey, melted mozzarella brings warmth that no one can resist, and the marinara sauce adds a rich, tangy flavor that ties everything together.
Step-by-Step Directions
-
Cook the Manicotti: Begin by bringing a large pot of water to a boil. Add the manicotti tubes and cook them until they reach an al dente texture, about 6 minutes. Drain the pasta and run it under cool water to stop the cooking process. Toss the tubes lightly in olive oil to prevent them from sticking together, then set them aside.
-
Preheat the Oven: Heat your oven to 400ºF (200ºC). This step is crucial for achieving the perfect cheesy crust later on.
-
Prepare the Filling: In a large bowl, combine the drained ricotta, 1 cup of shredded mozzarella, the Parmesan cheese, chopped parsley, and basil. Season this mixture generously with kosher salt and freshly ground black pepper to enhance the flavors.
-
Layer the Marinara: Spread 1 cup of marinara sauce evenly on the bottom of a 9” x 13” (22.8cm x 33cm) baking dish. This base will keep the manicotti moist and add rich flavor during baking.
-
Stuff the Manicotti: Using a long spoon or a pastry bag fitted with a large tip, carefully pipe the cheese mixture into each manicotti shell. Be generous but make sure not to overfill, as they need to fit snugly in the baking dish.
-
Assemble the Dish: Place each filled manicotti shell into the baking dish, aligning them in a single even layer. Pour the remaining marinara sauce over the top, ensuring that every shell is well coated. Sprinkle the rest of the mozzarella cheese evenly over the sauce.
-
Bake the Manicotti: Cover the baking dish with aluminum foil and bake in the preheated oven for about 30 minutes, allowing the cheese to melt and the flavors to meld. After this initial baking time, remove the foil and continue baking for an additional 10 minutes, or until the cheese is delightfully browned in spots.
-
Serve: Once baked, let the manicotti cool slightly before serving. This pause allows the filling to set, making it easier to dish out.
Tips & Tricks
- Prevent Sticking: After boiling the manicotti tubes, tossing them in olive oil can avert that dreaded sticking together.
- No Pastry Bag? Use a sturdy ziplock bag with a corner snipped off instead of a pastry bag for filling the tubes.
- Make Ahead: Prepare the manicotti in advance, refrigerate it, and bake it when you’re ready for dinner. Just add a few extra minutes to the baking time if it’s straight from the fridge.
- Add a Kick: Spice lovers can incorporate red pepper flakes or Italian seasoning into the cheese mixture for an extra flavor boost.
Serving Suggestions & Pairings
Manicotti is versatile when it comes to serving options. It pairs beautifully with a fresh Italian salad dressed in olive oil and balsamic vinegar. A side of garlic bread can add that perfect crunchy contrast to the creamy pasta. For beverage options, pair it with a lightly chilled white wine or a crisp sparkling water with a twist of lemon to complement the tangy marinara.
Nutritional Information
On average, a serving of manicotti contains approximately 350-400 calories. The dish is rich in protein thanks to the cheeses, and it provides a good amount of calcium. To keep meals balanced, serve manicotti alongside a variety of vegetables or a light salad.
Storing Tips & Variations
If you have leftovers, store the manicotti in an airtight container in the refrigerator for up to three days. You can also freeze it before baking—just ensure you wrap it tightly in foil or plastic wrap. When you’re ready to enjoy it, bake directly from frozen, allowing for extra time.
For variations, consider stuffing the manicotti with sautéed spinach or mushrooms, or even adding ground turkey or chicken for a heartier filling. You can also experiment with different sauces, like Alfredo or pesto, for a unique twist.
Conclusion
I encourage you to try making manicotti for your next family dinner or gathering, and I’m sure it will be a hit! The experience of cooking and sharing this classic dish with loved ones is one that you won’t forget. Give it a go, and don’t hesitate to share your experience and any personal twists you incorporate into this timeless recipe.
FAQs
-
Can I make manicotti without cheese?
Yes! You can use a variety of fillings such as lentils, sautéed vegetables, or quinoa mixed with spices for a vegan option. -
How do I know when the manicotti is done?
The cheese should be melted and bubbly with some browning on top. Check that the pasta is tender by piercing it with a fork. -
Can I use store-bought pasta?
Absolutely! Fresh or frozen manicotti can save you some time, and they will taste wonderful with the same filling. -
What type of marinara sauce should I use?
You can use store-bought or homemade marinara. A good quality sauce will elevate the dish significantly. -
Is manicotti suitable for freezing?
Yes, manicotti can be frozen both before and after baking. Just remember to allow it to thaw before cooking or increase the baking time accordingly.
Manicotti
Ingredients
Method
- Bring a large pot of water to a boil. Add the manicotti tubes and cook until al dente, about 6 minutes. Drain and run under cool water to stop cooking. Toss with olive oil and set aside.
- Preheat the oven to 400ºF (200ºC).
- In a large bowl, combine drained ricotta, 1 cup of shredded mozzarella, Parmesan cheese, parsley, and basil. Season with kosher salt and black pepper.
- Spread 1 cup of marinara sauce evenly on the bottom of a 9” x 13” baking dish.
- Stuff the cheese mixture into each manicotti shell, being careful not to overfill.
- Place stuffed shells into the baking dish in an even layer. Pour remaining marinara sauce over the top and sprinkle with remaining mozzarella.
- Cover the baking dish with foil and bake for about 30 minutes. Remove foil and bake for an additional 10 minutes until the cheese is browned.
- Let the manicotti cool slightly before serving to allow the filling to set.


Leave a Reply